Saturday, April 4, 2015

Server Socket (TCP) With Microsoft Azure

When we working on the real time applications Microsoft azure provides the facilities to run our all kind of applications from oldest to latest technologies. With my earlier post i explained how to create SignalR applications for real time operations

Today I'm gonna introduce create Server socket with the Azure .


1. Create new Azure Cloud project
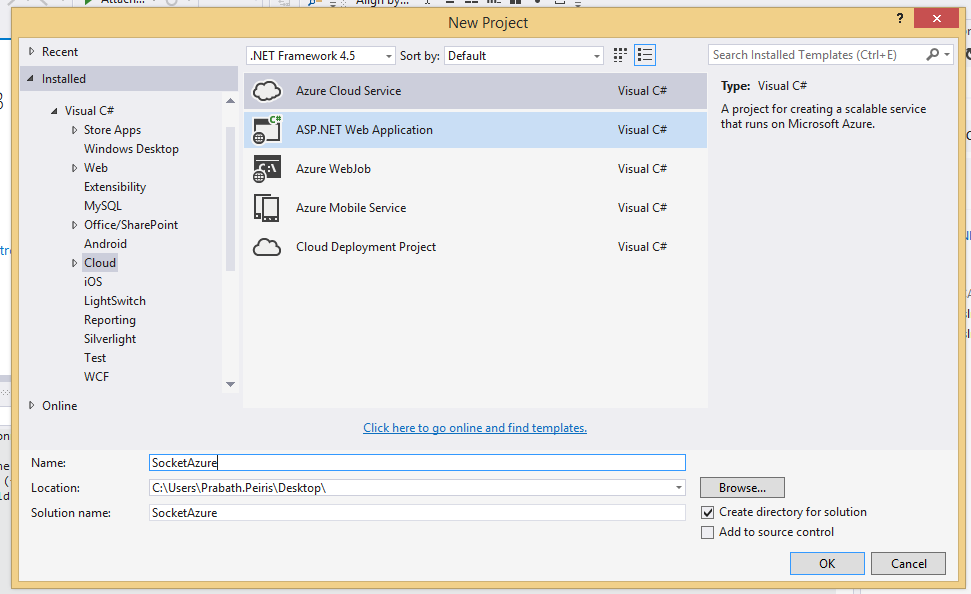


2. Create new Azure Worker Role  with the solution. I named it as Socket Worker 


3. Then you need to add endpoint to Worker role. If you are working on TCP Just add TCP endpoint in the worker role  as follows


External clients use public port to send traffic to service using public port

actually they send traffic through this port .  Here is how people send traffic http://mysitedomain:2020/

Azure load balancer send the traffic (re route the traffic to Worker Role) through the private port to the Virtual Machine that run the worker role

(More)

4. Then Create your regular TCP Listener (It  may be UDP/TCP/Http/Https, Azure support all  ) Code inside the run

Replace the Run() as following with auto reset event

private AutoResetEvent connectionWaitHandle = new AutoResetEvent(false);
public override void Run()
       {
           TcpListener listener = null;
           try
           {
               //Create TCp Listener to Listen endpoint define in the Worker Role
               listener = new TcpListener(RoleEnvironment.CurrentRoleInstance.InstanceEndpoints["TcpEndpoint"].IPEndpoint);
               listener.ExclusiveAddressUse = false;
               listener.Start();
           }
           catch (SocketException)
           {
               Trace.Write("Echo server could not start.", "Error");
               return;
           }
 
           //Listen to the all requests 
           while (true)
           {
               //Handle requests Asynchronously 
               IAsyncResult result = listener.BeginAcceptTcpClient(HandleAsyncConnection, listener);
               connectionWaitHandle.WaitOne();
           }
       }

5. Then create Async request handle with following. **All important areas are commented


      /// <summary>
/// Handle Async requests 
/// </summary>
/// <param name="result"></param>
private void HandleAsyncConnection(IAsyncResult result)
{
    // Accept connection 
    TcpListener listener = (TcpListener)result.AsyncState;
    TcpClient client = listener.EndAcceptTcpClient(result);
    connectionWaitHandle.Set();
 
    // Setup reader/writer 
    NetworkStream netStream = client.GetStream();
    StreamReader reader = new StreamReader(netStream);
    // Show application 
    string input = string.Empty;
    while (true)
    {               
 
        //Get the input line 
        input = reader.ReadLine();
 
        Trace.TraceInformation(input);
    }
    // Done! 
    client.Close();
}

Run and enjoy  :)



Full Code In Media Fire 
http://bit.ly/SocketAzure


Sunday, March 8, 2015

MongoDb With C Sharp

This post is related with the post that I put few months ago, If you don't have already configured Mongodb on the machine Here is the post that I put

Big question ?? How we use Mongo With C#? Is it hard?

Its really easy to use Mongo in .NET ,

Here im going to create Asp.NET Web API project for demonstration. (You can use any type of project )

Then Install official MongoDb Driver for .NET it name as MongoCsharpDriver Nuget package


Here is screenshot of my Mongo Database and document that I'm going to use


Here is the class I created for mongo operations


using MongoDB.Bson;
using MongoDB.Driver;
using System;
using System.Collections.Generic;
using System.Linq;
using System.Web;
 
namespace MongoDb.Models.MongoModels
{
    public class MongoConnection
    {
        private MongoServer _ServerConnection { get; set; }
        public MongoDatabase _Database { get; set; }
        public string _ConnectionString { get { return "Server=localhost:27017"; } }
        public MongoConnection()
        {
            MongoClient client = new MongoClient(_ConnectionString);
            this._ServerConnection = client.GetServer();
            ////////////////////Old way of create server////////////////////
            //this._ServerConnection=MongoServer.Create(_ConnectionString);
 
            //Set the database 
            this._Database = _ServerConnection.GetDatabase("DocumentOrDb");
        }
 
        /// <summary>
        /// Get all data in the document
        /// </summary>
        /// <returns></returns>
        public MongoCursor<BsonDocument> GetAllUserdata()
        {
            return _Database.GetCollection<BsonDocument>("UserDetails").FindAll();
        }
 
        /// <summary>
        /// Insert Item
        /// </summary>
        /// <param name="name"></param>
        /// <param name="address"></param>
        /// <returns></returns>
        public BsonDocument Insert(string name, string address)
        {
            MongoCollection<BsonDocument> UserDetails = _Database.GetCollection<BsonDocument>("UserDetails");
 
            BsonDocument NewRecord = new BsonDocument()
            {
               { "Name",name},
               {"Address",address}
            };
 
            UserDetails.Insert(NewRecord);
            //return last inserted element 
            return UserDetails.FindAll().Last();
        }
    }
 
}

**This code is use latest standards of official mongo driver up to today 
Then use this class with the code. That's It

Enjoy :)


Full Code 
http://bit.ly/MongoCSharp

Thursday, March 5, 2015

First SignalR Codes

Lets start SignalR with hands on ,

Not like usual chat demos in SignalR , We are going to make counter application which displays number of connected nodes to the web

1. Create New empty ASP.Net web project with visual studio
2. The install following Nuget on the Application
   Microsoft.AspNet.SignalR
 After Installing SignalR Your solution automatically get the Scripts for signal R


3. Add Hub Class to the solution by Add -> New Item -> SignalR Hub Class(v2)
Name it as CountHub 


4. Then Modify the CountHub with following code
[HubName("hithub")]
   public class CountHub : Hub
   {
       public static int count = 0;
 
       /// <summary>
       /// Once user open window with this URL hitter called 
       /// </summary>
       public void Hitter()
       {
           count++;
           Clients.All.OnHit(count);
       }
 
       /// <summary>
       /// User disconnected OnDisconnected automatically fired 
       /// </summary>
       /// <param name="stopCalled"></param>
       /// <returns></returns>
       public override System.Threading.Tasks.Task OnDisconnected(bool stopCalled)
       {
           count--;
           Clients.All.OnHit(count);
            return base.OnDisconnected(stopCalled);
       }
   }

in here HubName attribute should be start with simple letter. Otherwise it will not working

In here Client.All broadcast with all connected clients .

5. Then add Owin Start up class to build the start up with the web application Named it as StartUp


6. add Configuration for SingnalR in Startup
public void Configuration(IAppBuilder app)
       {
           app.MapSignalR();
       }

8. Now we are done with SignaR server side coding. Lets build HTML client for SignalR
Create html page in solution (default.html) and refer signalR and Jquery to the web page

<script src="Scripts/jquery-1.6.4.js"></script>
   <script src="Scripts/jquery.signalR-2.2.0.js"></script>
  
9. Then add following script after it . Comments discribes the code

<script type="text/javascript">
    $(function () {
        //Create hub connection 
        var conection = $.hubConnection();
 
        //create hub proxy 
        var hub = conection.createHubProxy("hithub");
 
        //get message with the hub proxy to latest update in count 
        hub.on("OnHit", function (count) {
            $('#count').text(count);
        });
 
        //Call hitter 
        conection.start(function()
        {
            hub.invoke('hitter')
        });
    })
</script> 
 
 
10. Modify the body of html as follows

<body>
    <h2 id="count">0</h2>
</body>


Run and enjoy,


Happy coding


Full Code 
http://bit.ly/1G1YOze

Thursday, February 26, 2015

MethMvvm Visual Studio extention for C Sharp developers


  • meth - public method
  • methp - private method
  • propmvvm - mvvm property
 Features & Benefits
This will enable you to create methods in C# easily with double tap. And also enabled to crate MVVM properties easily. to do thet you have to create PropertyChange event . as follows,


public event PropertyChangedEventHandler PropertyChanged;
 
        protected void OnPropertyChanged(string name)
        {
            PropertyChangedEventHandler handler = PropertyChanged;
            if (handler != null)
            {
                handler(this, new PropertyChangedEventArgs(name));
            }
        }

CodePlex Project and Download Link

Friday, February 6, 2015

Prism MVVM pattern with Applcaition development

Prism is one of the design patterns which defined by Microsoft Patterns and Practices team for building composite Applications in C# , XAML (WPF,Store Applications etc ) .

Why MVVM is not enough ?

When we creating application with MVVM there is few questions and practices we need to figure out. 
  • Should I use Prism to provide support for MVVM?
  • Should I use a dependency injection container?
    • Which dependency injection container should I use?
    • When is it appropriate to register and resolve components with a dependency injection container?
    • Should a component's lifetime be managed by the container?
  • Should the app construct views or view models first?
  • How should I connect view models to views?
    • Should I use XAML or code-behind to set the view's DataContext property?
    • Should I use a view model locator object?
    • Should I use an attached property to automatically connect view models to views?
    • Should I use a convention-based approach?
  • Should I expose commands from my view models?
  • Should I use behaviors in my views?
  • Should I include design time data support in my views?
  • Do I need to support a view model hierarchy?
 (reference https://msdn.microsoft.com/en-us/library/windows/apps/xx130657.aspx )

Why Prism?

Prism contains wire frame which can help to accelerate application development in  MVVM and It already contains commonly required core features in application development.


Let's Start Coding 


Here we are going to create windows store application using Prism

1. Create new windows store application project (Blank application)
2. Go to package manager console or manage nuget packages and install prism nuget to the application

 3. Now starts coding . Here we are using MVVM and I create few folders to isolate resources in the project such as
  • ViewModel - for ViewModel
  • Model - for Model
  • Controles - for BaseControls
  • View - for XAML pages 
  • Enum - for enumerations
  • Interfaces - for Interfaces 
and then put MainPage.xaml  in to teh View Folder (drag and drop)

Now my project like this


 Code for prism
 Now we have to convert our application to prism
1. App.XAML and App.XAML.cs

<prism:MvvmAppBase
    x:Class="SamplePrism.App"
    xmlns:prism="using:Microsoft.Practices.Prism.Mvvm"
    xmlns="http://schemas.microsoft.com/winfx/2006/xaml/presentation"
    xmlns:x="http://schemas.microsoft.com/winfx/2006/xaml"
    xmlns:local="using:SamplePrism">
 
</prism:MvvmAppBase> 
 
 
sealed partial class App : MvvmAppBase
   {
       public App()
       {
           this.InitializeComponent();
       }
 
       protected override Task OnLaunchApplicationAsync(LaunchActivatedEventArgs args)
       {
          //Main is the name of view i need to navigate 
           this.NavigationService.Navigate("Main", null);
 
           return Task.FromResult<object>(null);
       }
   } 


2. Then create PageBase in controls  from Prism MVVM

public abstract partial class PageBase: Page,IView
   {
   } 
3. Then Use this page base in our Views, xaml

 Change MainPage.xaml and MainPage.xaml.cs as  follows
<controls:PageBase
    x:Class="SamplePrism.Views.MainPage"
    xmlns:prism="using:Microsoft.Practices.Prism.Mvvm"
    xmlns:controls="using:SamplePrism.Controls"
    xmlns="http://schemas.microsoft.com/winfx/2006/xaml/presentation"
    xmlns:x="http://schemas.microsoft.com/winfx/2006/xaml"
    xmlns:local="using:SamplePrism.Views"
    xmlns:d="http://schemas.microsoft.com/expression/blend/2008"
    xmlns:mc="http://schemas.openxmlformats.org/markup-compatibility/2006"
    prism:ViewModelLocator.AutoWireViewModel="True"
    xmlns:designtime="using:SamplePrism.DesignTimeViewModel"
    mc:Ignorable="d">

public sealed partial class MainPage : PageBase
    {
        public MainPage()
        {
            this.InitializeComponent();
        }
    }

4. In here I'm craeting Interface to keep the properties of MainPage But this is optional. You can jsut implement the ViewModel without this interface


Here is My interface


public interface IMainPageViewModel
   {
       string Title { get; set; }
   }


5. Lets Starts MainPageViewModel

public class MainPageViewModel : ViewModel, IMainPageViewModel
   {
       string _Title = default(string);
       public string Title { get { return _Title; } set { SetProperty(ref _Title, value); } }
 
       public override void OnNavigatedTo(object navigationParameter, NavigationMode navigationMode, Dictionary<string, object> viewModelState)
       {
           this.Title = "Hello prism";
       }
   }

With prism MVVM it conains basic funtions in store app such like OnNavigatedTo , OnNavigatedFrom etc. You can directly use them inside the ViewModel 

Run and Enjoy the Prism.

It is really easy to build in complex applications in enterprise level. even if you  not like Prism code in specific scenario you can switch with your old MVVM too inside the same project


Full Code 
http://bit.ly/1DL68OI