Showing posts with label Cloud Computing. Show all posts

Thursday, January 21, 2016

Web API From Code (Entity frameworkk code first model)

If you going to target mobile based applications to the small business you need to have API/web service on the hand.

Today we are going to develop Web API within few minutes.

Im using entity framework code first model approach here. (You can use same approach with Asp.NET web sites too) 

Advantages of Code first Model
  • All handle in the code. Full control with the code
  • No need to worry about the database

Here is the scenario today im working.

There is DVD rental store. Which each user can get one or more movie dvd's . 


1. Create Asp.NET web API project
2. Then Add the following classes to it in model

TransactionId is auto increment 

/// <summary>
/// User Db Model 
/// </summary>
public class User
{
    public Guid UserId { get; set; }
    public string UserName { get; set; }
    public string NIC { get; set; }
    public DateTime BirthDay { get; set; }
 
    //One user may have multiple transactions
    public virtual ICollection<Transaction> Transactions { get; set; }
}

/// <summary>
/// Video Db Model
/// </summary>
public class Video
{
    public Guid VideoId { get; set; }
    public string VideoName { get; set; }
    public string Publisher { get; set; }
 
    //One video may have multiple transactions 
    public virtual ICollection<Transaction> Transactions { get; set; }
}

/// <summary>
/// Transaction db model
/// </summary>
public class Transaction
{
    [DatabaseGenerated(DatabaseGeneratedOption.Computed)]
    public int TransactionId { get; set; }
    public Guid UserId { get; set; }
    public Guid VideoId { get; set; }
    public DateTime ReserveDate { get; set; }
    public DateTime ReturnDate { get; set; }
 
    //Add forign key 
    public virtual Video Video { get; set; }
    public virtual User User { get; set; }
} 

3. Install Entity Framework
4. Create Db Context file (RentalContext)
/// <summary>
/// Database context 
/// </summary>
public class RentalContext:DbContext
{
    public RentalContext():base("RentalContext")
    {
 
    }
 
    /******************Database tables ******************/
    public DbSet<User> UserSet { get; set; }
    public DbSet<Video> VideoSet { get; set; }
    public DbSet<Transaction> TranactionSet { get; set; }
 
    protected override void OnModelCreating(DbModelBuilder modelBuilder)
    {
         base.OnModelCreating(modelBuilder);
    }
}

5. Then create Db initialize to change database when any changes happen with model
***With few sample data

public class RentalInitilizer : DropCreateDatabaseIfModelChanges<RentalContext>
{
    /// <summary>
    /// Add sampe data to the database 
    /// </summary>
    /// <param name="context"></param>
    protected override void Seed(RentalContext context)
    {
        List<User> Users = new List<User>()
        {
            new User(){BirthDay=Convert.ToDateTime("1990-05-03"),NIC="90563247855V",UserId=new Guid("93d82550-eefb-4b08-aab9-aa0cf8f3309f"),UserName="Dummy User1"},
            new User(){BirthDay=Convert.ToDateTime("1990-05-03"),NIC="90563247855V",UserId=new Guid("93d92550-eefb-4b08-aab9-aa0cf8f3309f"),UserName="Dummy User2"},
            new User(){BirthDay=Convert.ToDateTime("1990-05-03"),NIC="90563247855V",UserId=new Guid("93d82550-eefb-4b08-aab9-aa0cf8f3309f"),UserName="Dummy User3"}
 
        };
 
        Users.ForEach(x => context.UserSet.Add(x));
 
        List<Video> Videos = new List<Video>()
        {
            new Video(){Publisher="Publisger 1",VideoId=new Guid("4fb4912c-6f7d-4d34-8fd0-9ec641ae328d"), VideoName="Video 1"},
            new Video(){Publisher="Publisger 2",VideoId=new Guid("bcfc276a-8c41-40ad-bb7b-05731dbfcce5"), VideoName="Video 2"},
            new Video(){Publisher="Publisger 3",VideoId=new Guid("6a95ce93-6b9d-4d29-9bb0-fb69e2bb53bb"), VideoName="Video 6"}
 
        };
        Videos.ForEach(x => context.VideoSet.Add(x));
 
        List<Transaction> Transactions = new List<Transaction>()
        {
            new Transaction(){ReserveDate=DateTime.Now,ReturnDate=DateTime.Now.AddDays(5),UserId= new Guid("93d82550-eefb-4b08-aab9-aa0cf8f3309f"),VideoId=new Guid("6a95ce93-6b9d-4d29-9bb0-fb69e2bb53bb")},
            new Transaction(){ReserveDate=DateTime.Now,ReturnDate=DateTime.Now.AddDays(5),UserId= new Guid("93d82550-eefb-4b08-aab9-aa0cf8f3309f"),VideoId=new Guid("bcfc276a-8c41-40ad-bb7b-05731dbfcce5")}
 
        };
        Transactions.ForEach(x => context.TranactionSet.Add(x));
 
        context.SaveChanges();
        
       base.Seed(context);
    }
}
 

6. Edit the config
Add context to the entity framework
  <entityFramework>
    <defaultConnectionFactory type="System.Data.Entity.Infrastructure.LocalDbConnectionFactory, EntityFramework">
      <parameters>
        <parameter value="mssqllocaldb" />
      </parameters>
    </defaultConnectionFactory>
    <providers>
      <provider invariantName="System.Data.SqlClient" type="System.Data.Entity.SqlServer.SqlProviderServices, EntityFramework.SqlServer" />
    </providers>
    <contexts>
      <context type="SEF_CodeFirst_API.Models.DbModels.RentalContext, SEF_CodeFirst_API">
        <databaseInitializer type="EF_CodeFirst_API.Models.DbModels.RentalInitializer, SEF_CodeFirst_API" />
      </context>
    </contexts>
  </entityFramework>

Add the  Connection string
 <connectionStrings>
    <add name="RentalContext" 
 connectionString="Data Source=(LocalDb)\v11.0;Initial Catalog=Rental;Integrated Security=SSPI;" 
 providerName="System.Data.SqlClient" />
  </connectionStrings>


Then  you have to create Controller's from Entity framework with read write options.. you are in


Enjoy


Saturday, April 4, 2015

Server Socket (TCP) With Microsoft Azure

When we working on the real time applications Microsoft azure provides the facilities to run our all kind of applications from oldest to latest technologies. With my earlier post i explained how to create SignalR applications for real time operations

Today I'm gonna introduce create Server socket with the Azure .


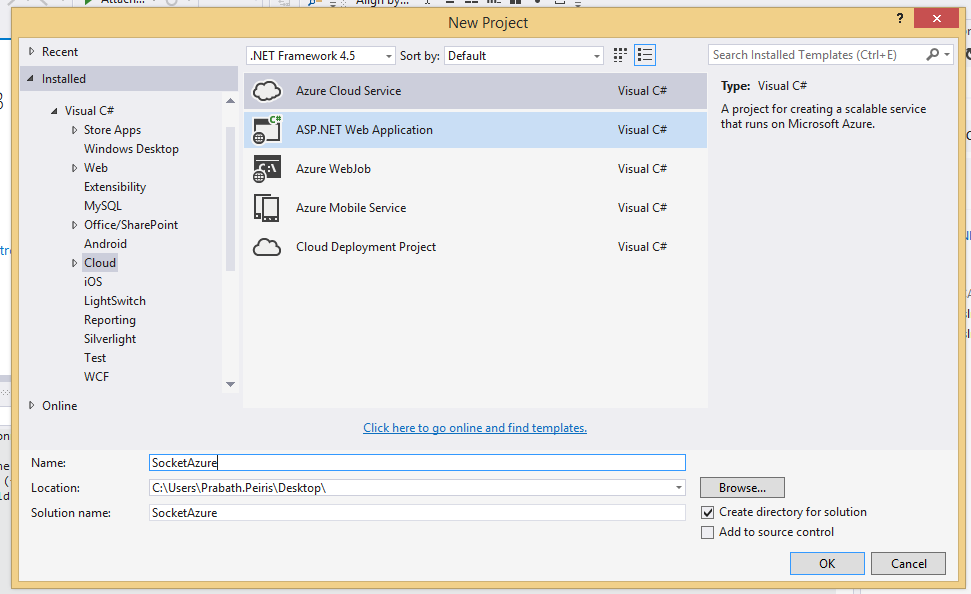
1. Create new Azure Cloud project


2. Create new Azure Worker Role  with the solution. I named it as Socket Worker 


3. Then you need to add endpoint to Worker role. If you are working on TCP Just add TCP endpoint in the worker role  as follows


External clients use public port to send traffic to service using public port

actually they send traffic through this port .  Here is how people send traffic http://mysitedomain:2020/

Azure load balancer send the traffic (re route the traffic to Worker Role) through the private port to the Virtual Machine that run the worker role

(More)

4. Then Create your regular TCP Listener (It  may be UDP/TCP/Http/Https, Azure support all  ) Code inside the run

Replace the Run() as following with auto reset event

private AutoResetEvent connectionWaitHandle = new AutoResetEvent(false);
public override void Run()
       {
           TcpListener listener = null;
           try
           {
               //Create TCp Listener to Listen endpoint define in the Worker Role
               listener = new TcpListener(RoleEnvironment.CurrentRoleInstance.InstanceEndpoints["TcpEndpoint"].IPEndpoint);
               listener.ExclusiveAddressUse = false;
               listener.Start();
           }
           catch (SocketException)
           {
               Trace.Write("Echo server could not start.", "Error");
               return;
           }
 
           //Listen to the all requests 
           while (true)
           {
               //Handle requests Asynchronously 
               IAsyncResult result = listener.BeginAcceptTcpClient(HandleAsyncConnection, listener);
               connectionWaitHandle.WaitOne();
           }
       }

5. Then create Async request handle with following. **All important areas are commented


      /// <summary>
/// Handle Async requests 
/// </summary>
/// <param name="result"></param>
private void HandleAsyncConnection(IAsyncResult result)
{
    // Accept connection 
    TcpListener listener = (TcpListener)result.AsyncState;
    TcpClient client = listener.EndAcceptTcpClient(result);
    connectionWaitHandle.Set();
 
    // Setup reader/writer 
    NetworkStream netStream = client.GetStream();
    StreamReader reader = new StreamReader(netStream);
    // Show application 
    string input = string.Empty;
    while (true)
    {               
 
        //Get the input line 
        input = reader.ReadLine();
 
        Trace.TraceInformation(input);
    }
    // Done! 
    client.Close();
}

Run and enjoy  :)


Full Code In Media Fire 
http://bit.ly/SocketAzure


Thursday, March 5, 2015

First SignalR Codes

Lets start SignalR with hands on ,

Not like usual chat demos in SignalR , We are going to make counter application which displays number of connected nodes to the web

1. Create New empty ASP.Net web project with visual studio
2. The install following Nuget on the Application
   Microsoft.AspNet.SignalR
 After Installing SignalR Your solution automatically get the Scripts for signal R


3. Add Hub Class to the solution by Add -> New Item -> SignalR Hub Class(v2)
Name it as CountHub 


4. Then Modify the CountHub with following code
[HubName("hithub")]
   public class CountHub : Hub
   {
       public static int count = 0;
 
       /// <summary>
       /// Once user open window with this URL hitter called 
       /// </summary>
       public void Hitter()
       {
           count++;
           Clients.All.OnHit(count);
       }
 
       /// <summary>
       /// User disconnected OnDisconnected automatically fired 
       /// </summary>
       /// <param name="stopCalled"></param>
       /// <returns></returns>
       public override System.Threading.Tasks.Task OnDisconnected(bool stopCalled)
       {
           count--;
           Clients.All.OnHit(count);
            return base.OnDisconnected(stopCalled);
       }
   }

in here HubName attribute should be start with simple letter. Otherwise it will not working

In here Client.All broadcast with all connected clients .

5. Then add Owin Start up class to build the start up with the web application Named it as StartUp


6. add Configuration for SingnalR in Startup
public void Configuration(IAppBuilder app)
       {
           app.MapSignalR();
       }

8. Now we are done with SignaR server side coding. Lets build HTML client for SignalR
Create html page in solution (default.html) and refer signalR and Jquery to the web page

<script src="Scripts/jquery-1.6.4.js"></script>
   <script src="Scripts/jquery.signalR-2.2.0.js"></script>
  
9. Then add following script after it . Comments discribes the code

<script type="text/javascript">
    $(function () {
        //Create hub connection 
        var conection = $.hubConnection();
 
        //create hub proxy 
        var hub = conection.createHubProxy("hithub");
 
        //get message with the hub proxy to latest update in count 
        hub.on("OnHit", function (count) {
            $('#count').text(count);
        });
 
        //Call hitter 
        conection.start(function()
        {
            hub.invoke('hitter')
        });
    })
</script> 
 
 
10. Modify the body of html as follows

<body>
    <h2 id="count">0</h2>
</body>


Run and enjoy,


Happy coding


Full Code 
http://bit.ly/1G1YOze

Tuesday, February 3, 2015

Tips to build Real time Applications (SignalR)

What is real time ? People who use the applications they need to see the actions one it happens . No delays or refreshing even it is desktop application, App , web or some other application.

How its possible ?

There is few options that developer can looking at.
1. Running background thread
2. Use SignalR

1st option that I describe here is not the best option in most of the times. Running background thread all times is resource consuming and it always use pulling (grab the data from the remote). And there is security concerns as well. But believe me there is some applications which we need to use this and thread is worth than other .


Most pf the time best option is SignalR

What is SignalR ?
 SignalR is series of abstractions around various methods of providing persistent Http Connections. Simply it makes real time communication without effort 

 Where ?
SignalR can be in
  1. Web application
  2. Desktop Applicaton 
  3. App (windows /iOs/Android/berry ) 

 It is cross platform tool  (totally open source) which capable of running with any platform.


SignalR is Client Server

To use SignalR you need to have Server (basically you can create serever with asp.net i'll add posts future)

And client application, (if you use javascript no need to have client nuget to consume SignalR) you can make any application by just adding SignalR nugets to your project.

Microsoft Asp.Net SignalR 


Modern servers from Windows Server 2012 is support SignalR (Real time Communication perfectly )

There is life beyond  Web Sockets


Lets meet with handons later :) enjoy

SignalR Coading 

Tuesday, January 13, 2015

Time Zone clonflictions with Cloud Services .. How to avoid .

There is problems when you are developing applications which based on cloud services. That is , time of your service (servers ) are different than the time that your application. If you are using time stamp based data pulling  from the cloud service you are in big trouble.

Here if two basic solutions that you can use in those scenarios
1. Use UTC (absolute) Time (highly recommended)
2. Change time zone of the server according to the  requirement

Use absolute time you can just do with simple DateTime object.
in C# simply like this
DateTime.UtcNow

Change Time zone of the Server ( Instances of cloud service )
This is the Task that you cannot find lot of documentation
 If you follow following steps You can easily change server time zone ( In azure (cloud) it will randomly create and no one can predict that which instance of the server will run entire service life cycle *Its never happens with cloud) in every running instance once it starting


1. Create batch (*.bat) file with flowing command
tzutil /s "Sri Lanka Standard Time" 
 

Here is time zone reference 

IndexName of Time ZoneTime
000Dateline Standard Time(GMT-12:00) International Date Line West
001Samoa Standard Time(GMT-11:00) Midway Island, Samoa
002Hawaiian Standard Time(GMT-10:00) Hawaii
003Alaskan Standard Time(GMT-09:00) Alaska
004Pacific Standard Time(GMT-08:00) Pacific Time (US and Canada); Tijuana
010Mountain Standard Time(GMT-07:00) Mountain Time (US and Canada)
013Mexico Standard Time 2(GMT-07:00) Chihuahua, La Paz, Mazatlan
015U.S. Mountain Standard Time(GMT-07:00) Arizona
020Central Standard Time(GMT-06:00) Central Time (US and Canada
025Canada Central Standard Time(GMT-06:00) Saskatchewan
030Mexico Standard Time(GMT-06:00) Guadalajara, Mexico City, Monterrey
033Central America Standard Time(GMT-06:00) Central America
035Eastern Standard Time(GMT-05:00) Eastern Time (US and Canada)
040U.S. Eastern Standard Time(GMT-05:00) Indiana (East)
045S.A. Pacific Standard Time(GMT-05:00) Bogota, Lima, Quito
050Atlantic Standard Time(GMT-04:00) Atlantic Time (Canada)
055S.A. Western Standard Time(GMT-04:00) Caracas, La Paz
056Pacific S.A. Standard Time(GMT-04:00) Santiago
060Newfoundland and Labrador Standard Time(GMT-03:30) Newfoundland and Labrador
065E. South America Standard Time(GMT-03:00) Brasilia
070S.A. Eastern Standard Time(GMT-03:00) Buenos Aires, Georgetown
073Greenland Standard Time(GMT-03:00) Greenland
075Mid-Atlantic Standard Time(GMT-02:00) Mid-Atlantic
080Azores Standard Time(GMT-01:00) Azores
083Cape Verde Standard Time(GMT-01:00) Cape Verde Islands
085GMT Standard Time(GMT) Greenwich Mean Time: Dublin, Edinburgh, Lisbon, London
090Greenwich Standard Time(GMT) Casablanca, Monrovia
095Central Europe Standard Time(GMT+01:00) Belgrade, Bratislava, Budapest, Ljubljana, Prague
100Central European Standard Time(GMT+01:00) Sarajevo, Skopje, Warsaw, Zagreb
105Romance Standard Time(GMT+01:00) Brussels, Copenhagen, Madrid, Paris
110W. Europe Standard Time(GMT+01:00) Amsterdam, Berlin, Bern, Rome, Stockholm, Vienna
113W. Central Africa Standard Time(GMT+01:00) West Central Africa
115E. Europe Standard Time(GMT+02:00) Bucharest
120Egypt Standard Time(GMT+02:00) Cairo
125FLE Standard Time(GMT+02:00) Helsinki, Kiev, Riga, Sofia, Tallinn, Vilnius
130GTB Standard Time(GMT+02:00) Athens, Istanbul, Minsk
135Israel Standard Time(GMT+02:00) Jerusalem
140South Africa Standard Time(GMT+02:00) Harare, Pretoria
145Russian Standard Time(GMT+03:00) Moscow, St. Petersburg, Volgograd
150Arab Standard Time(GMT+03:00) Kuwait, Riyadh
155E. Africa Standard Time(GMT+03:00) Nairobi
158Arabic Standard Time(GMT+03:00) Baghdad
160Iran Standard Time(GMT+03:30) Tehran
165Arabian Standard Time(GMT+04:00) Abu Dhabi, Muscat
170Caucasus Standard Time(GMT+04:00) Baku, Tbilisi, Yerevan
175Transitional Islamic State of Afghanistan Standard Time(GMT+04:30) Kabul
180Ekaterinburg Standard Time(GMT+05:00) Ekaterinburg
185West Asia Standard Time(GMT+05:00) Islamabad, Karachi, Tashkent
190India Standard Time(GMT+05:30) Chennai, Kolkata, Mumbai, New Delhi
193Nepal Standard Time(GMT+05:45) Kathmandu
195Central Asia Standard Time(GMT+06:00) Astana, Dhaka
200Sri Lanka Standard Time(GMT+06:00) Sri Jayawardenepura
201N. Central Asia Standard Time(GMT+06:00) Almaty, Novosibirsk
203Myanmar Standard Time(GMT+06:30) Yangon Rangoon
205S.E. Asia Standard Time(GMT+07:00) Bangkok, Hanoi, Jakarta
207North Asia Standard Time(GMT+07:00) Krasnoyarsk
210China Standard Time(GMT+08:00) Beijing, Chongqing, Hong Kong SAR, Urumqi
215Singapore Standard Time(GMT+08:00) Kuala Lumpur, Singapore
220Taipei Standard Time(GMT+08:00) Taipei
225W. Australia Standard Time(GMT+08:00) Perth
227North Asia East Standard Time(GMT+08:00) Irkutsk, Ulaanbaatar
230Korea Standard Time(GMT+09:00) Seoul
235Tokyo Standard Time(GMT+09:00) Osaka, Sapporo, Tokyo
240Yakutsk Standard Time(GMT+09:00) Yakutsk
245A.U.S. Central Standard Time(GMT+09:30) Darwin
250Cen. Australia Standard Time(GMT+09:30) Adelaide
255A.U.S. Eastern Standard Time(GMT+10:00) Canberra, Melbourne, Sydney
260E. Australia Standard Time(GMT+10:00) Brisbane
265Tasmania Standard Time(GMT+10:00) Hobart
270Vladivostok Standard Time(GMT+10:00) Vladivostok
275West Pacific Standard Time(GMT+10:00) Guam, Port Moresby
280Central Pacific Standard Time(GMT+11:00) Magadan, Solomon Islands, New Caledonia
285Fiji Islands Standard Time(GMT+12:00) Fiji Islands, Kamchatka, Marshall Islands
290New Zealand Standard Time(GMT+12:00) Auckland, Wellington
300Tonga Standard Time(GMT+13:00) Nuku'alofa

2. Add it in to the cloud service ( Not to the cloud service project )

*Add it to project which identifies as role (web, worker) by cloud project . In following example You need to add batch file into WebRole1 project


3. Then R-Click on the batch file and select properties from visual studio . In properties under the Advanced change Copy To Output Directory property in to copy always.


4. Then go to the Cloud project and open the ServiceDefinition.csdf file


5. Under WebRole Tag add Start up task as follow .

 <WebRole name="*****" vmsize="Small">
    <Startup>
      <Task commandLine="NameOfBatchFile.bat" executionContext="elevated" taskType="simple"/>
    </Startup> 
     <Sites>
      <Site name="Web">
        <Bindings>
          <Binding name="Endpoint1" endpointName="Endpoint1" />
        </Bindings>
      </Site>
    </Sites>
    <Endpoints>
      <InputEndpoint name="Endpoint1" protocol="http" port="80" />
    </Endpoints>
  </WebRole>


Now it is done ... You free to go with your cloud service


Enjoy 


Saturday, October 11, 2014

Windows Azure Mobile Authentication Service

Magic with Azure mobile services is easy handling in Authentication for users. It allows you to authenticate users
1. Microsoft Account
2. Facebook Account
3. Twitter Account
4. Google Account
5. Azure Active Directory

What else developer need..

To enable all of those authentications you need to have apps running on those platforms. Url's for creating apps on each service provider is given below (Creating app on your hand *Get the developer manual help according to each technology)

1. Microsoft - https://account.live.com/developers/applications
2. Facebook - https://developers.facebook.com/ (Click on App's menu)
3. Twitter - https://apps.twitter.com/app/new
4. Google - https://console.developers.google.com/project

** In every instance that you create apps use your Azure Mobile Service Url 
HERE is URL for Microsoft Login
for json backend :https://<mobile_service>.azure-mobile.net/login/microsoftaccount
for .NET backend :https://todolist.azure-mobile.net/signin-microsoft


With later posts you can see how to use Azure Active directory

Start from the beginning

1. First login to your Azure portal and go to Mobile Services


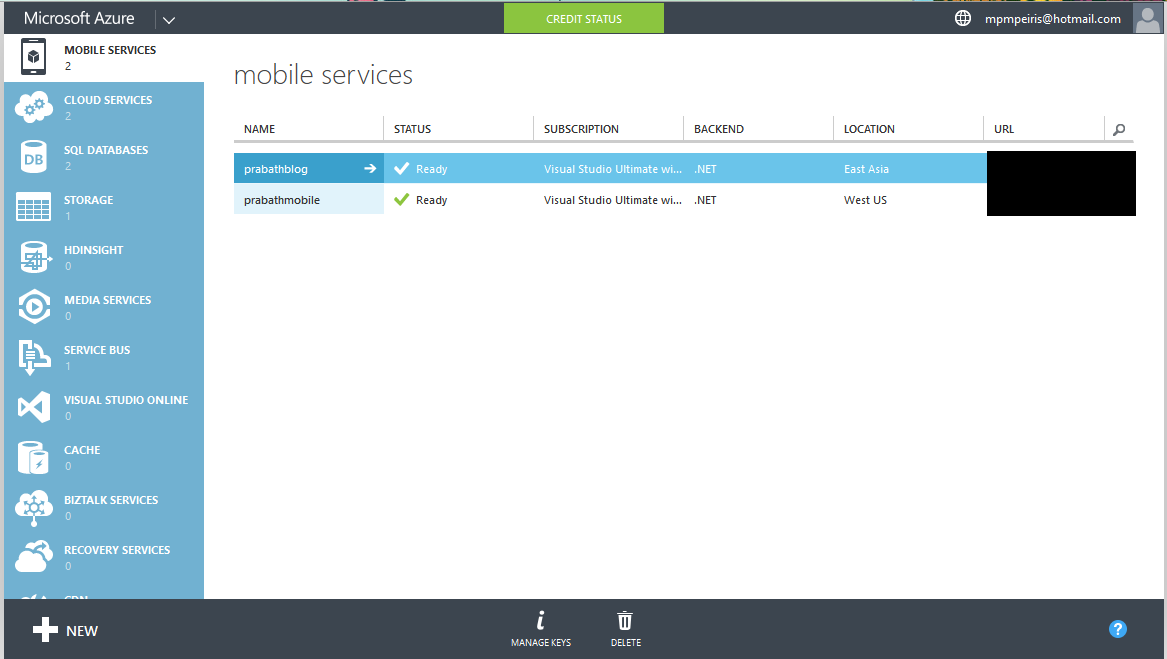
2. Then select your Mobile Service , in here I have already created Mobile Service for the Azure Mobile Services post named as prabathblog. Select it and go inside. Then select IDENTITY  Tab from menu.


3. Fill the values according to the Login provider with details


4. Then go to the dashboard and download the app.

5. Use this code to authenticate in client side

        /// <summary>
        /// Simple authenticate
        /// </summary>
        /// <returns></returns>
        private async Task AuthenticateAsyncSimple()
        {
            while (user == null)
            {
                string message;
                try
                {
                    user = await App.MobileService
                        .LoginAsync(MobileServiceAuthenticationProvider.MicrosoftAccount);
                    message =
                        string.Format("You are now logged in - {0}", user.UserId);
                }
                catch (InvalidOperationException)
                {
                    message = "You must log in. Login Required";
                }
 
                var dialog = new MessageDialog(message);
                dialog.Commands.Add(new UICommand("OK"));
                await dialog.ShowAsync();
            }
        }


Enjoy your code


Sunday, August 24, 2014

Back-end operations with Cloud Service (Worker Roles)

With my previous post about Creating Cloud Service I mentioned two Roles in Azure.
1. Web Role
2. Worker Role

With this Post we will working with Worker Role . I'm using the same code that I use in Creating Cloud Service  post

What is Worker Role ??

Worker role is the component that doing background operations in Azure web service. If you need to implement background service such as background listener with your cloud service this is the component for you.

With physically Worker role is the Virtual machine which running the Server OS (Windows Server 2012 R2) without configuring IIS.( check the Web Role definition in Creating Cloud Service ).
Actually both of the Web Role and Worker Roles are derived from RoleEntryPoint Base class.

According to the OOP principles, yes Web Role can do the same Task that Worker Role can do. ( I hope to make discussion about it with later post ). We just give the chance to handle Web related tasks to web role and use worker role to handle non web based tasks. Because Web role may be over loaded when it try to handle all within it. Then Web role is free to handle more web based requests with more speed.

 Lets Code
,

1. Open the code in visual studio and check it is working (Creating Cloud Service). Then go to the solution explorer

2. On the AzureServiceDemo -> Roles -> R - click -> New Worker Role Project


Then Select Worker Role and give name.. I'm giving PrabathslWorkerRole as name


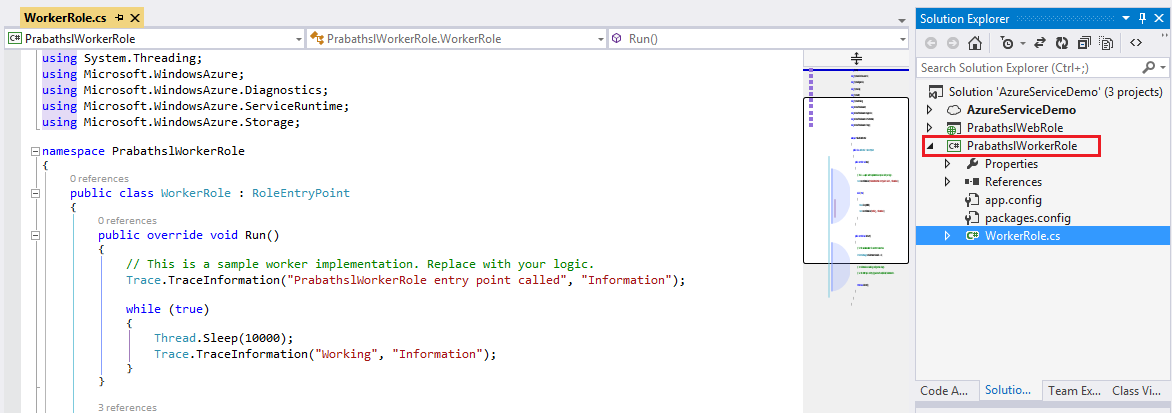
After add the worker role you can see that it will add Worker Role project to your solution ans that project contains only one class called WorkerRole.cs


I'll add that class here for explanation

using System;
using System.Collections.Generic;
using System.Diagnostics;
using System.Linq;
using System.Net;
using System.Threading;
using Microsoft.WindowsAzure;
using Microsoft.WindowsAzure.Diagnostics;
using Microsoft.WindowsAzure.ServiceRuntime;
using Microsoft.WindowsAzure.Storage;
namespace PrabathslWorkerRole
{
    public class WorkerRole : RoleEntryPoint
    {
        public override void Run()
        {
            // This is a sample worker implementation. Replace with your logic.
            Trace.TraceInformation("PrabathslWorkerRole entry point called", "Information");
            while (true)
            {
                Thread.Sleep(10000);
                Trace.TraceInformation("Working", "Information");
            }
        }
        public override bool OnStart()
        {
            // Set the maximum number of concurrent connections
            ServicePointManager.DefaultConnectionLimit = 12;
            // For information on handling configuration changes
            // see the MSDN topic at http://go.microsoft.com/fwlink/?LinkId=166357.
            return base.OnStart();
        }
    }
}

Simply public override bool OnStart() method is called when Role Started then it called public override void Run() Method. Run method should contain what we need to do in background. In here I'm going to configure HTTP listener.It take some inputs and generate output.  If it needed to do repeatedly you need to add it inside forever while (true) loop

Also web role can forward jobs to the Worker role and Worker Role can also get inputs directly by it self. For that we can also insert our WCF service i worker role as well .

Replace the Run() with following code to listen port=4488 with HTTP protocol  ...
public override void Run()
       {
           HttpListener listner = new HttpListener();
           //This will ping to Http://myserviceurl:4488 port
           listner.Prefixes.Add("http://+:4488/");
           listner.Start();
  
           //Set the response to transformable format
           string responseMessage = "<html><title>Response from Worker</title><body><h1>Prabathsl.blogspot.com</h1></body></html>";
            byte[] buffer = Encoding.UTF8.GetBytes(responseMessage);
  
  
           while (true)
           {
               HttpListenerContext context = listner.GetContext();
  
               //then set the response
               HttpListenerResponse response = context.Response;
               response.ContentLength64 = buffer.Length;
               Stream output = response.OutputStream;
  
               //write output stream
               output.WriteAsync(buffer, 0, buffer.Length);
               output.Close();
           }
       }

This is local for the Azure VM.


Currently our VM's are haven't any external access.To allow access to the worker role we need change some configurations.

 That called input end point. Lets define input endpoints. it allows traffic to go through our VM


3. Goto AzureServiceDemo Solution and Roles then double click on PrabathslWorkerRole

4. Click on Endpoints -> Add Endpoint button and add endpoint. I named it as prabathslEndpoint


External clients use this port to send traffic to service using public port

actually they send traffic through this port .  Here is how people send traffic http://mysitedomain:4080/

Azure load balancer send the traffic (re route the traffic to Worker Role) through the private port to the Virtual Machine that run the worker role (4488)

**You can use any port as you wish

Now we are done and run it ..

Here is what i get when Listen to localhost
(http://127.0.0.1:4080/) We need to listen public port


Full Code In Media Fire 
http://bit.ly/worker_role