
When we are working with different requirements in a project there may be issues like this. Clients want to available all data in the application (with application) just for authorized users. Ex: All management portals may just only available for mangers
In this kind of scenario developers need to maintain separate authentication mechanisms to authenticate users. Specially those mechanisms may not be the perfect in security point of view.
Azure provide great solution for it with the help of Visual Studio. You can use Azure Active Directory (AD) users to authenticate. It will very secure and its just use Azure portal log in to your application. You can use log ins in your on premises Active Directory too. You need to just make tunnel between Azure active directory and your on premises AD. Then all changes in your on premises AD is Sync with Azure AD with help of Active Directory Federation Service (ADFS)
Lets start our project
1. First Login to Azure Portal manage.windowsazure.com and then go to the Click on Active Directory

2. If you don't have AD User Directory to use Then Click on New -> Active Directory -> Directory->Custom create

3. From the wizard you can use existing directory or create new directory. If you use existing directory to create new directory all the users in that directory will be added to the new one. In here I'm going to create new directory

4. Once directory created click on it and go to users . It will automatically added created user as user.
5. If you need to add user to AD Click on ADD User button in bottom and add user. May be existing AD , From Microsoft account or may be company user. In later in this post I'll tell you how to add company user

Im adding Microsoft Account

Fill the required data and you are done
Create New User


If you enabled Multi-Factor Authentication it will ask for phone number verification with SMS when user login . Its Nice feature .......
Just like in Microsoft Store Login ....Its free
Then Create temproy Password

If you need sent password to the user

And Done :)
Lets go back ..
Now we have Azure AD with required users ..
Now go to Visual studio and start Azure Cloud service project as in my previous post Creating Cloud Service Up to Step 3
Here is step 3
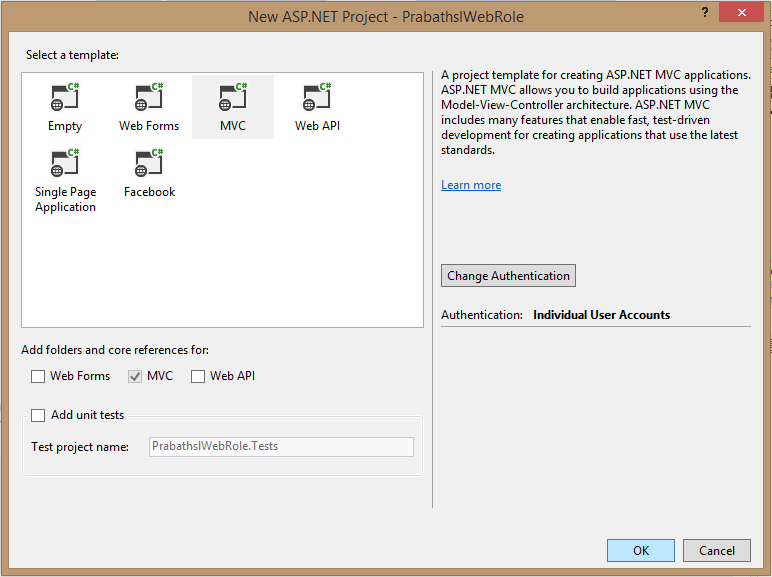
In here click on Change Authentication button.
Then use Organizational Account option

Select Single sign On (here we just use Azure AD)

Enter your Azure AD Domain and select the required authorities from Access level

Then click Ok we are done .......
Debug Tips ..
If you found user credential verification failed azure error with visual studio
Enjoy
In this kind of scenario developers need to maintain separate authentication mechanisms to authenticate users. Specially those mechanisms may not be the perfect in security point of view.
Azure provide great solution for it with the help of Visual Studio. You can use Azure Active Directory (AD) users to authenticate. It will very secure and its just use Azure portal log in to your application. You can use log ins in your on premises Active Directory too. You need to just make tunnel between Azure active directory and your on premises AD. Then all changes in your on premises AD is Sync with Azure AD with help of Active Directory Federation Service (ADFS)
Lets start our project
1. First Login to Azure Portal manage.windowsazure.com and then go to the Click on Active Directory
2. If you don't have AD User Directory to use Then Click on New -> Active Directory -> Directory->Custom create
3. From the wizard you can use existing directory or create new directory. If you use existing directory to create new directory all the users in that directory will be added to the new one. In here I'm going to create new directory
4. Once directory created click on it and go to users . It will automatically added created user as user.
5. If you need to add user to AD Click on ADD User button in bottom and add user. May be existing AD , From Microsoft account or may be company user. In later in this post I'll tell you how to add company user
Im adding Microsoft Account
Fill the required data and you are done
Create New User
If you enabled Multi-Factor Authentication it will ask for phone number verification with SMS when user login . Its Nice feature .......
Just like in Microsoft Store Login ....Its free
Then Create temproy Password
If you need sent password to the user
And Done :)
Lets go back ..
Now we have Azure AD with required users ..
Now go to Visual studio and start Azure Cloud service project as in my previous post Creating Cloud Service Up to Step 3
Here is step 3
In here click on Change Authentication button.
Then use Organizational Account option
Select Single sign On (here we just use Azure AD)
Enter your Azure AD Domain and select the required authorities from Access level
Then click Ok we are done .......
Debug Tips ..
If you found user credential verification failed azure error with visual studio
- Shut down Visual Studio
- Go to your Azure management portal, and create a new user account within the Active Directory you created (I set mine as a Global Admin).
- Open up VS again and go through the steps of creating the WebApi project. This time, when you choose Organizational Accounts for authentication, use the credentials of the user that you just created - it should work now.
Enjoy


0 comments:
Post a Comment