Showing posts with label Universal Apps. Show all posts

Friday, January 22, 2016

Dependency Injection - Intro

This gonna be post series which I gonna continue .. Because this is bit complex and without theoretical part hard to understand.

Fist thing first.. Lets move with theoretical background of it with this post

 Assume this scenario.. - Entire Post sequence will use  this as example
There is student registration system we need to develop solution for student registration  

Here is our usual MVC code.


public class Student
   {
       public int StudentId { getset; }
       public string StudentName { getset; }
       public string RegId { getset; }
       public int Age { getset; }
 
 
       public IEnumerable<Student> GetStudents()
       {
           return new List<Student>();
       }
   }
 
Model Class 
 
public class StudentController : Controller
    {
        private readonly Student _student;
        public StudentController()
        {
            _student = new Student();
        }
        // GET: /<controller>/
 
        public IActionResult Index()
        {
            var data = _student.GetStudents();
            return View(data);
        }
    }
Controller Class 


In this way Model and controller is tightly coupled ( change of one class will effect other ) .  This way is not good in large scale projects a importantly. ( not recommend in any case )

You can find advantages and disadvantages of tight coupled code in OOP concepts.


  Dependency Injection


Dependency injection is the best way to create loose coupled code and resolve dependencies among the  classes .

In dependency injection some other class is responsible for injecting the dependencies in to client class(ex: Student Controller) we called it injector class at application run time.


here is object Diagram of it


Here is code how its look like with DI

public class Student:IStudent
   {
       public IEnumerable<Student> GetStudents()
       {
           return new List<Student>();
       }
   }
 
   public interface IStudent
   {
       IEnumerable<Student> GetStudents();
   }


public class StudentController : Controller
    {
        private readonly IStudent _student;
        public StudentController(IStudent student)
        {
            _student = student;
        }
        // GET: /<controller>/
 
        public IActionResult Index()
        {
            var data = _student.GetStudents();
            return View(data);
        }
    }
 
Enjoy Coding .. next post is on the way

Tuesday, February 3, 2015

Tips to build Real time Applications (SignalR)

What is real time ? People who use the applications they need to see the actions one it happens . No delays or refreshing even it is desktop application, App , web or some other application.

How its possible ?

There is few options that developer can looking at.
1. Running background thread
2. Use SignalR

1st option that I describe here is not the best option in most of the times. Running background thread all times is resource consuming and it always use pulling (grab the data from the remote). And there is security concerns as well. But believe me there is some applications which we need to use this and thread is worth than other .


Most pf the time best option is SignalR

What is SignalR ?
 SignalR is series of abstractions around various methods of providing persistent Http Connections. Simply it makes real time communication without effort 

 Where ?
SignalR can be in
  1. Web application
  2. Desktop Applicaton 
  3. App (windows /iOs/Android/berry ) 

 It is cross platform tool  (totally open source) which capable of running with any platform.


SignalR is Client Server

To use SignalR you need to have Server (basically you can create serever with asp.net i'll add posts future)

And client application, (if you use javascript no need to have client nuget to consume SignalR) you can make any application by just adding SignalR nugets to your project.

Microsoft Asp.Net SignalR 


Modern servers from Windows Server 2012 is support SignalR (Real time Communication perfectly )

There is life beyond  Web Sockets


Lets meet with handons later :) enjoy

SignalR Coading 

Sunday, January 18, 2015

Working in designtime with Data in MVVM

If we develop applications ( XAML based) we have a problem with see the data in design view. Every application become successful when its interface is attractive. If our application is based on internet or any other computational task there is difficulty on make Interfaces without running the application real time. Here is solution for it

Use design time data binding which already with the xaml based application 

Today we going to develop the windows 8.1 store application. ( This is same with any XAML based Application )

1. Create Windows 8.1 store application form the Visual studio. (I named it as DesignTimedata )
2. Create ViewModel to bind the run time data , In following here is My MainViewModel.cs

With this example we are not going to the use internet or other tasks .therefore just hard corded the values in constructor 

namespace DesignTimeData.Runtime
{
    public class MainViewModel:INotifyPropertyChanged
    {
 
        private string _Title { getset; }
        public string Title
        {
            get { return _Title; }
            set
            {
                _Title = value;
                OnPropertyChanged("Title");
            }
        }
 
        private string _Description { getset; }
        public string Description
        {
            get { return _Description; }
            set
            {
                _Description = value;
                OnPropertyChanged("Description");
            }
        }


        public MainViewModel()
        {
        // Hard coded runtime data
            this._Title = "Title in Run time";
            this._Description = "Lorem ipsum dolor sit amet, consectetuer adipiscing elit. Maecenas porttitor congue massa. Fusce posuere, magna sed pulvinar ultricies, purus lectus malesuada libero, sit amet commodo magna eros quis urna.";
        }
 
        // Create the OnPropertyChanged method to raise the event 
        // Use in MVVM
        public event PropertyChangedEventHandler PropertyChanged;
        protected void OnPropertyChanged(string name)
        {
            PropertyChangedEventHandler handler = PropertyChanged;
            if (handler != null)
            {
                handler(thisnew PropertyChangedEventArgs(name));
            }
        }
    }
}


2. Then bind the ViewModel to the View with relevant tags.
You can use Singleton or Page Resource binding . In here Im using Bind the ViewModel to the Page in XAML . It gives me intellisense in XAML .

Here is my MainPage.xaml

<Page
    x:Class="DesignTimeData.MainPage"
    xmlns="http://schemas.microsoft.com/winfx/2006/xaml/presentation"
    xmlns:x="http://schemas.microsoft.com/winfx/2006/xaml"
    xmlns:local="using:DesignTimeData"
    xmlns:d="http://schemas.microsoft.com/expression/blend/2008"
    xmlns:mc="http://schemas.openxmlformats.org/markup-compatibility/2006"
    xmlns:runtime="using:DesignTimeData.Runtime"
    mc:Ignorable="d">
    
    <Page.DataContext>
        <runtime:MainViewModel/>
    </Page.DataContext>
 
3 .Then Create New Class which have exact name of your view model. Better to use different namespace / folder . In this case It is MainViewModel 
Here is my design time ViewModel. It will contains all test data which displayed in design view in visual studio


namespace DesignTimeData.DesignTimedata
{
    public class MainViewModel
    {
        public string Title { get { return "DesignTime Title"; } }
 
        public string Description { get { return "Design time description"; } }
    }
} 

4. Then lets bind the design time data into the design (xaml) . In here there is always tag like this
      mc:Ignorable="d" 
with every page. something defines under this tag will not be displayed in the runtime. then this is the one that we need to use.

With this d we can define all the properties which page have and change them. but none of them are effecting the real application .

Lets bind the ViewModel to the page and use it with design time . Here is my full page

<Page
    x:Class="DesignTimeData.MainPage"
    xmlns="http://schemas.microsoft.com/winfx/2006/xaml/presentation"
    xmlns:x="http://schemas.microsoft.com/winfx/2006/xaml"
    xmlns:local="using:DesignTimeData"
    xmlns:d="http://schemas.microsoft.com/expression/blend/2008"
    xmlns:mc="http://schemas.openxmlformats.org/markup-compatibility/2006"
    xmlns:desgn="using:DesignTimeData.DesignTimedata"
    xmlns:runtime="using:DesignTimeData.Runtime"
    mc:Ignorable="d">
    
    <Page.DataContext>
        <runtime:MainViewModel/>
    </Page.DataContext>
    
    <d:Page.DataContext>
        <desgn:MainViewModel />
    </d:Page.DataContext>
    
    <Grid Background="{ThemeResource ApplicationPageBackgroundThemeBrush}">
        <StackPanel Margin="100,150,0,0">
            <TextBlock Style="{StaticResource HeaderTextBlockStyle}" Text="{Binding Title}"/>
            <TextBlock Style="{StaticResource SubtitleTextBlockStyle}" Text="{Binding Description}"/>
        </StackPanel>
    </Grid>
</Page>

Now we can see the vaues that we put to test the Application UI and make any changes to it.


Here is runtime result of the app


Enjoy


Full Code 
http://bit.ly/1xiJ3yZ


Thursday, November 6, 2014

Authentication with third party Auth providers in new era of Mobile Apps

When you are developing app, to increase security and manipulate users without taking user details is use authentication providers help such like Live, Google, Facebook, twitter , linked in, flickers etc.

With the newer versions of mobile BCL is not supported the olde way of authenticating with third party SDK's. All the BCL are updated with 8.1 and Universal apps.

With this post I'm gonna explain how to implement those authentication (ex: facebook)

1. you need to have facebook app. (http:\\developer.facebook.com)

To implement the Authentication you need to create separate class and interface that can handle Continuation events. Once authentication done it will redirect to the app using these Continuation objects.

Here is ContinuationManager Class that I used

using System.Text;
using Windows.ApplicationModel.Activation;
using Windows.UI.Xaml;
using Windows.UI.Xaml.Controls;
 
#if WINDOWS_PHONE_APP
    /// <summary>
    /// ContinuationManager is used to detect if the most recent activation was due
    /// to a continuation such as the FileOpenPicker or WebAuthenticationBroker
    /// </summary>
    public class ContinuationManager
    {
        IContinuationActivatedEventArgs args = null;
        bool handled = false;
        Guid id = Guid.Empty;
 
        /// <summary>
        /// Sets the ContinuationArgs for this instance. Using default Frame of current Window
        /// Should be called by the main activation handling code in App.xaml.cs
        /// </summary>
        /// <param name="args">The activation args</param>
        internal void Continue(IContinuationActivatedEventArgs args)
        {
            Continue(args, Window.Current.Content as Frame);
        }
 
        /// <summary>
        /// Sets the ContinuationArgs for this instance. Should be called by the main activation
        /// handling code in App.xaml.cs
        /// </summary>
        /// <param name="args">The activation args</param>
        /// <param name="rootFrame">The frame control that contains the current page</param>
        internal void Continue(IContinuationActivatedEventArgs args, Frame rootFrame)
        {
            if (args == null)
                throw new ArgumentNullException("args");
 
            if (this.args != null && !handled)
                throw new InvalidOperationException("Can't set args more than once");
 
            this.args = args;
            this.handled = false;
            this.id = Guid.NewGuid();
 
            if (rootFrame == null)
                return;
 
            switch (args.Kind)
            {
               
 
                case ActivationKind.WebAuthenticationBrokerContinuation:
                    var wabPage = rootFrame.Content as IWebAuthenticationContinuable;
                    if (wabPage != null)
                    {
                        wabPage.ContinueWebAuthentication(args as WebAuthenticationBrokerContinuationEventArgs);
                    }
                    break;
            }
        }
 
        /// <summary>
        /// Marks the contination data as 'stale', meaning that it is probably no longer of
        /// any use. Called when the app is suspended (to ensure future activations don't appear
        /// to be for the same continuation) and whenever the continuation data is retrieved 
        /// (so that it isn't retrieved on subsequent navigations)
        /// </summary>
        internal void MarkAsStale()
        {
            this.handled = true;
        }
 
        /// <summary>
        /// Retrieves the continuation args, if they have not already been retrieved, and 
        /// prevents further retrieval via this property (to avoid accidentla double-usage)
        /// </summary>
        public IContinuationActivatedEventArgs ContinuationArgs
        {
            get
            {
                if (handled)
                    return null;
                MarkAsStale();
                return args;
            }
        }
 
        /// <summary>
        /// Unique identifier for this particular continuation. Most useful for components that 
        /// retrieve the continuation data via <see cref="GetContinuationArgs"/> and need
        /// to perform their own replay check
        /// </summary>
        public Guid Id { get { return id; } }
 
        /// <summary>
        /// Retrieves the continuation args, optionally retrieving them even if they have already
        /// been retrieved
        /// </summary>
        /// <param name="includeStaleArgs">Set to true to return args even if they have previously been returned</param>
        /// <returns>The continuation args, or null if there aren't any</returns>
        public IContinuationActivatedEventArgs GetContinuationArgs(bool includeStaleArgs)
        {
            if (!includeStaleArgs && handled)
                return null;
            MarkAsStale();
            return args;
        }
    }
 
    /// <summary>
    /// Implement this interface if your page invokes the web authentication
    /// broker
    /// </summary>
    interface IWebAuthenticationContinuable
    {
        /// <summary>
        /// This method is invoked when the web authentication broker returns
        /// with the authentication result
        /// </summary>
        /// <param name="args">Activated event args object that contains returned authentication token</param>
        void ContinueWebAuthentication(WebAuthenticationBrokerContinuationEventArgs args);
    }

To handle the continuation after authentication you nee to modify your app.xaml.cs as well. Because Once you redirect to auth providers screen you are exit (deactivate) your app. then once auth provider redirect back your app gets activate .

Create object of ContinuationManager  in App.xml.cs

public static ContinuationManager continuationManager { getprivate set; }

Then OnActivated event of the app add the continuation handle

protected async override void OnActivated(IActivatedEventArgs e)
{
   continuationManager = new ContinuationManager();
 
   //Check if this is a continuation 
   var continuationEventArgs = e as IContinuationActivatedEventArgs;
   if (continuationEventArgs != null)
   {
	continuationManager.Continue(continuationEventArgs);
   }
 
  Window.Current.Activate(); 
}


Then you are free to go with any kind of authentication that provide from auth provider 

    internal async Task FacebookLoginMethod()
        {
            String FacebookURL = "https://www.facebook.com/dialog/oauth?client_id=" + Uri.EscapeDataString("Your app Id") + "&redirect_uri=" + Uri.EscapeDataString("https://m.facebook.com/dialog/return/ms") + "&scope=read_stream&display=popup&response_type=token";
 
            System.Uri StartUri = new Uri(FacebookURL);
//To use windows phone or windows app with Fb authentication user this end uri and redirect uri. Both are working 
             System.Uri EndUri = new Uri("https://m.facebook.com/dialog/return/ms");
 
#if WINDOWS_PHONE_APP
            try
            {
                WebAuthenticationBroker.AuthenticateAndContinue(StartUri, EndUri, null, WebAuthenticationOptions.None);
            }
            catch
            {
 
            }
#endif
        }


and use this ContinueWeb authentication method inside the page that you call authentication. otherwise it will not working. Inherit the IWebAuthnticationContinuable interface to the page and add this method

public async void ContinueWebAuthentication(WebAuthenticationBrokerContinuationEventArgs args)
       {
           WebAuthenticationResult result = args.WebAuthenticationResult;
           if (result.ResponseStatus == WebAuthenticationStatus.Success)
           {
               token = await FilterToken(result.ResponseData.ToString());
 
           }
           else
           {
               MessageDialog Msg = new MessageDialog("Login failed");
               Msg.ShowAsync();
           }
 
       }


This WebAuthentication result wil contains the Authprovider's access token. Filterout it and do what ever graph is available with authentication provider. 


Enjoy ..


Saturday, October 11, 2014

Windows Azure Mobile Authentication Service

Magic with Azure mobile services is easy handling in Authentication for users. It allows you to authenticate users
1. Microsoft Account
2. Facebook Account
3. Twitter Account
4. Google Account
5. Azure Active Directory

What else developer need..

To enable all of those authentications you need to have apps running on those platforms. Url's for creating apps on each service provider is given below (Creating app on your hand *Get the developer manual help according to each technology)

1. Microsoft - https://account.live.com/developers/applications
2. Facebook - https://developers.facebook.com/ (Click on App's menu)
3. Twitter - https://apps.twitter.com/app/new
4. Google - https://console.developers.google.com/project

** In every instance that you create apps use your Azure Mobile Service Url 
HERE is URL for Microsoft Login
for json backend :https://<mobile_service>.azure-mobile.net/login/microsoftaccount
for .NET backend :https://todolist.azure-mobile.net/signin-microsoft


With later posts you can see how to use Azure Active directory

Start from the beginning

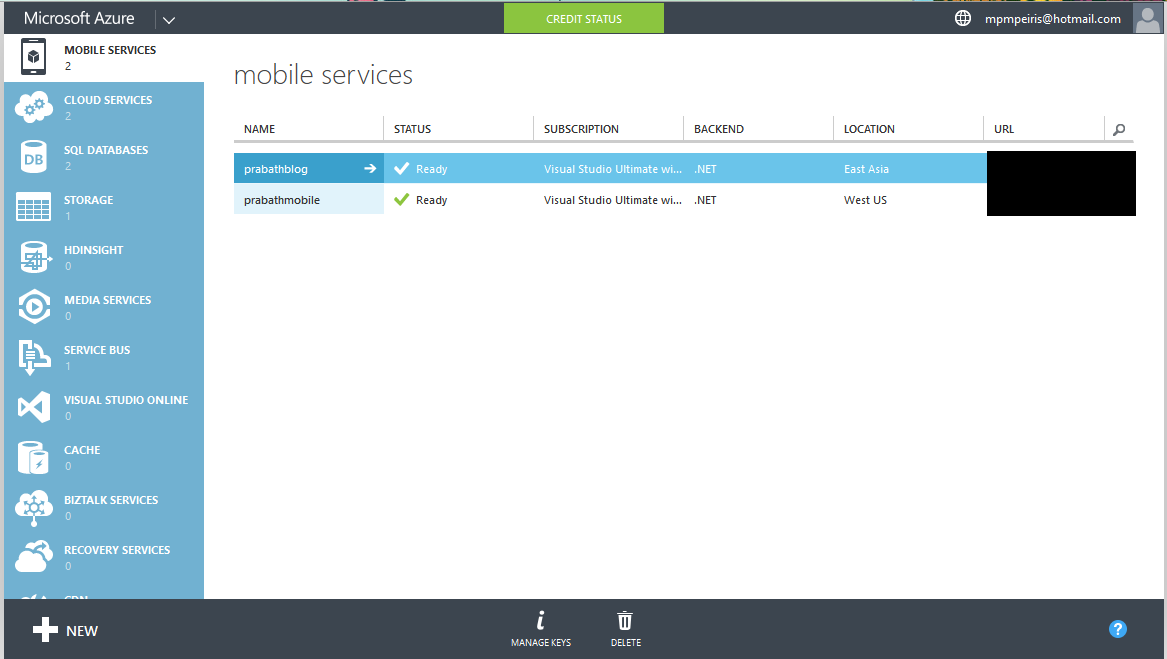
1. First login to your Azure portal and go to Mobile Services


2. Then select your Mobile Service , in here I have already created Mobile Service for the Azure Mobile Services post named as prabathblog. Select it and go inside. Then select IDENTITY  Tab from menu.


3. Fill the values according to the Login provider with details


4. Then go to the dashboard and download the app.

5. Use this code to authenticate in client side

        /// <summary>
        /// Simple authenticate
        /// </summary>
        /// <returns></returns>
        private async Task AuthenticateAsyncSimple()
        {
            while (user == null)
            {
                string message;
                try
                {
                    user = await App.MobileService
                        .LoginAsync(MobileServiceAuthenticationProvider.MicrosoftAccount);
                    message =
                        string.Format("You are now logged in - {0}", user.UserId);
                }
                catch (InvalidOperationException)
                {
                    message = "You must log in. Login Required";
                }
 
                var dialog = new MessageDialog(message);
                dialog.Commands.Add(new UICommand("OK"));
                await dialog.ShowAsync();
            }
        }


Enjoy your code


Saturday, September 13, 2014

Improve Performance of the Application

As and software producer all of us want to do is software product with correct functionality. Is that enough ? No. We need to give product with correct functionality with optimum resource consumption as well.

Today I'm going to tell you some tips and trikes about resource optimization. basically it is about Memory and CPU resources.

1. Switch for multiple If
 When you are using multiple If conditions ( Most of the time more than 2 ) CPU (Registry level) instructions check as far as use much If with code. It consume more registers in CPU. But with switch it just use check and Jump CPU instruction that far more faster than assignments. Using jump tables makes switches much faster than some if-statements

Use switch when ever possible once you find more than two if statements.

2. Use structures according to the situation
Execution of class is much more consume resources than class.  Whenever you don't need to use functions bind with objects and when you don't go with boxing and unboxing much with code.

3. Chunky calls
Don't let your functions to handle lot of task by itself. use modularity to avoid it.

4. Add Collections
Never try to assign collection items one by one to the another collection. Just try to use simple casting and try to add entire collection directly.

5. Working with strings.
When you are working with string most of the cases we try to concatenate string by '+'operator.(including me ). But sad story is there is more optimal solution than that. use string bulider to concatenate strings.

Here for start.

6. Use bits whenever as possible.
I saw most of the programmers use integers/strings to hold the simple states, flags. Please don't do that there is more than 2 states. Just use bit or bool to store states. It will optimize code and resource as well. ( Simply bit is smaller than more bits)

7. Array as possible
When we use simple basic array it will helpful to maintain machine instructions(registry). Other collections need more than array because most of them are derived form it. Array is basic element in modern machine instructions.

8. ObservableCollection vs List
Use List whenever that your items not binded with the UI. Observation collections are derived from List and it also holds the property changed notifications. If there is no use of property change go for List.  ObservableCollection check the property change when it on use and because of that it consume more.

9. For than foreach
Use while, for and do while loops wherever than foreah. foreach has good performance but basic loops are better than it.

10. ToString
Some  programmers use ToString method wherever elements are already strings. Use ToString wherever the element that con the string. don't use ToString as habit. With integers use
ToStringLookup will optimize memory heap that using with converting integer.

11. Don't sort collections already sorted.
Check collection already sorted or not before sort it.

12. Global variables.
Use global variables when you using same type of object frequently

13. Constant and static
Constants are not assignable memories but they are easy to load.

Static is more faster than instant creations. When load statics no need of run time to check the instance


Hope this is helps...


Tuesday, July 15, 2014

Azure Mobile Services ( Start to build)

Windows Azure cloud application provide quite amazing solutions for Mobile backed services. With Azure cloud applications allows you to store structured data (files and SQL Azure) , Authentication interrogation to Mobile applications and user updates via push notifications. Specially Azure is not only for Windows (Microsoft ) Products. It supports Window 8, Windows Phone , Android and iOS with different development platforms such as native platforms and Xamarin.

Lets build first Cloud app

1. First Log in to your Azure Portal and click on New button in left corner


2. Then from prompt Select Compute -> Mobile Service-> Create

3. With the next prompt add URL for your Mobile service in URL field. With Database field if you have already created database for mobile application back end select it if it is not select option Create new SQL Database instance  or Create Free 20MB SQL Database Option

Select your region and what kind of backed you need to have. it has .NET and Javascript backed. Choose your choise

If you plan to include Push notification with your app tick on  Advanced Push Notification Check box


4. If you checked Advanced Push Notification Check box this step you find the Push Notification Settings prompt. Azure notification hub is cross platform push notification service that can simultaneously broadcast notifications across the devices.

Create namespace to notification service and name your push notification Hub


5. Then you can define the Database Settings. You can define new database name , If you already have database server select it or else create new database server and give the credentials for it as you want.
If you need to make advanced changes to the database tick on Configure Advanced Database Settings  Check box.

With Advanced database settings you can limit the database capacity and define the character encoding for the data


Then our web service is up and it take few seconds to configure and make it online


Once our Service is created the screen is like this


Select the platform that you need to create app that using this service and scroll down to to GET STARTED area.

Expand the Create new App. (this depend on what you select in Choose Platform Area Select the language C# or JavaScript and download the applicattion.

Run it and enjoy your first cloud app