Today I'm going to introduce you create responsive , mobile friendly admin dashboard with MVC project.
There are multiple bootstrap admin dashboard templates and one of the most commonly used and strongest one is Admin LTE. This is totally open source project.
This will provide you great UI with documentations. Click here to see documentations.
This project is owned to Almsaeed
Studstudio . What i'm doing is removing some dependencies with 3rd party API's and make them call internally. Lets begin with Visual studio
1. Start new empty MVC project 2. Install Nuget Admin_Dashboard from nuget 3. Create Home empty controller and run
Now You are up and running this awsome template
Then afterwards you are on your own and find the relevant UI documentations form AdminLTE and use the components. all elements automatically will found with your project
You can use this template on MVC / Angular projects using visualstudio easyly **please ignore if there are some script error if it comes when installing nuget Enjoy :)
This gonna be post series which I gonna continue .. Because this is bit complex and without theoretical part hard to understand.
Fist thing first.. Lets move with theoretical background of it with this post
Assume this scenario.. - Entire Post sequence will use this as example There is student registration system we need to develop solution for student registration
publicclassStudentController : Controller
{
privatereadonlyStudent _student;
public StudentController()
{
_student = newStudent();
}
// GET: /<controller>/publicIActionResult Index()
{
var data = _student.GetStudents();
return View(data);
}
}
Controller Class
In this way Model and controller is tightly coupled ( change of one class will effect other ) . This way is not good in large scale projects a importantly. ( not recommend in any case )
You can find advantages and disadvantages of tight coupled code in OOP concepts.
Dependency Injection
Dependency injection is the best way to create loose coupled code and resolve dependencies among the classes .
In dependency injection some other class is responsible for injecting the dependencies in to client class(ex: Student Controller) we called it injector class at application run time.
With my previous post about Creating Cloud Service I mentioned two Roles in Azure.
1. Web Role
2. Worker Role
With this Post we will working with Worker Role . I'm using the same code that I use in Creating Cloud Service post
What is Worker Role ??
Worker role is the component that doing background operations in Azure web service. If you need to implement background service such as background listener with your cloud service this is the component for you.
With physically Worker role is the Virtual machine which running the Server OS (Windows Server 2012 R2) without configuring IIS.( check the Web Role definition in Creating Cloud Service ).
Actually both of the Web Role and Worker Roles are derived from RoleEntryPoint Base class.
According to the OOP principles, yes Web Role can do the same Task that Worker Role can do. ( I hope to make discussion about it with later post ). We just give the chance to handle Web related tasks to web role and use worker role to handle non web based tasks. Because Web role may be over loaded when it try to handle all within it. Then Web role is free to handle more web based requests with more speed. Lets Code ,
1. Open the code in visual studio and check it is working (Creating Cloud Service). Then go to the solution explorer
2. On the AzureServiceDemo -> Roles -> R - click -> New Worker Role Project
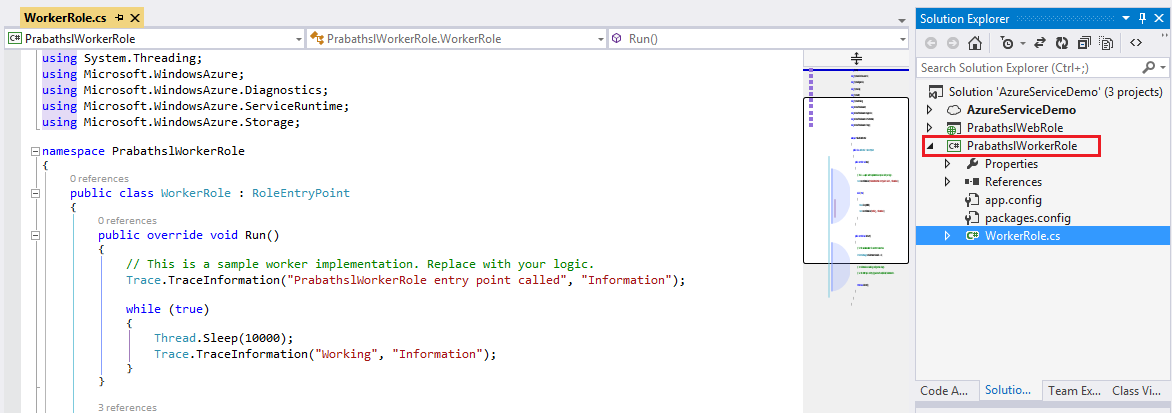
Then Select Worker Role and give name.. I'm giving PrabathslWorkerRole as name
After add the worker role you can see that it will add Worker Role project to your solution ans that project contains only one class called WorkerRole.cs
I'll add that class here for explanation
usingSystem;
usingSystem.Collections.Generic;
usingSystem.Diagnostics;
usingSystem.Linq;
usingSystem.Net;
usingSystem.Threading;
usingMicrosoft.WindowsAzure;
usingMicrosoft.WindowsAzure.Diagnostics;
usingMicrosoft.WindowsAzure.ServiceRuntime;
usingMicrosoft.WindowsAzure.Storage;
namespacePrabathslWorkerRole
{
publicclassWorkerRole : RoleEntryPoint
{
publicoverridevoidRun()
{
// This is a sample worker implementation. Replace with your logic.
Trace.TraceInformation("PrabathslWorkerRole entry point called", "Information");
while(true)
{
Thread.Sleep(10000);
Trace.TraceInformation("Working", "Information");
}
}
publicoverrideboolOnStart()
{
// Set the maximum number of concurrent connections
ServicePointManager.DefaultConnectionLimit = 12;
// For information on handling configuration changes
Simply publicoverridebool OnStart() method is called when Role Started then it called publicoverridevoid Run() Method. Run method should contain what we need to do in background. In here I'm going to configure HTTP listener.It take some inputs and generate output. If it needed to do repeatedly you need to add it inside forever while (true) loop
Also web role can forward jobs to the Worker role and Worker Role can also get inputs directly by it self. For that we can also insert our WCF service i worker role as well .
Replace the Run() with following code to listen port=4488 with HTTP protocol ...
Currently our VM's are haven't any external access.To allow access to the worker role we need change some configurations.
That called input end point. Lets define input endpoints. it allows traffic to go through our VM
3. Goto AzureServiceDemo Solution and Roles then double click on PrabathslWorkerRole
4. Click on Endpoints -> Add Endpoint button and add endpoint. I named it as prabathslEndpoint
External clients use this port to send traffic to service using public port
actually they send traffic through this port . Here is how people send traffic http://mysitedomain:4080/
Azure load balancer send the traffic (re route the traffic to Worker Role) through the private port to the Virtual Machine that run the worker role (4488)
**You can use any port as you wish
Now we are done and run it ..
Here is what i get when Listen to localhost
(http://127.0.0.1:4080/) We need to listen public port
When we are working with different requirements in a project there may be issues like this. Clients want to available all data in the application (with application) just for authorized users. Ex: All management portals may just only available for mangers
In this kind of scenario developers need to maintain separate authentication mechanisms to authenticate users. Specially those mechanisms may not be the perfect in security point of view.
Azure provide great solution for it with the help of Visual Studio. You can use Azure Active Directory (AD) users to authenticate. It will very secure and its just use Azure portal log in to your application. You can use log ins in your on premises Active Directory too. You need to just make tunnel between Azure active directory and your on premises AD. Then all changes in your on premises AD is Sync with Azure AD with help of Active Directory Federation Service (ADFS)
Lets start our project
1. First Login to Azure Portal manage.windowsazure.com and then go to the Click on Active Directory
2. If you don't have AD User Directory to use Then Click on New -> Active Directory -> Directory->Custom create
3. From the wizard you can use existing directory or create new directory. If you use existing directory to create new directory all the users in that directory will be added to the new one. In here I'm going to create new directory
4. Once directory created click on it and go to users . It will automatically added created user as user.
5. If you need to add user to AD Click on ADD User button in bottom and add user. May be existing AD , From Microsoft account or may be company user. In later in this post I'll tell you how to add company user
Im adding Microsoft Account
Fill the required data and you are done Create New User
If you enabled Multi-Factor Authentication it will ask for phone number verification with SMS when user login . Its Nice feature .......
Just like in Microsoft Store Login ....Its free
Then Create temproy Password
If you need sent password to the user
And Done :)
Lets go back ..
Now we have Azure AD with required users ..
Now go to Visual studio and start Azure Cloud service project as in my previous post Creating Cloud Service Up to Step 3 Here is step 3
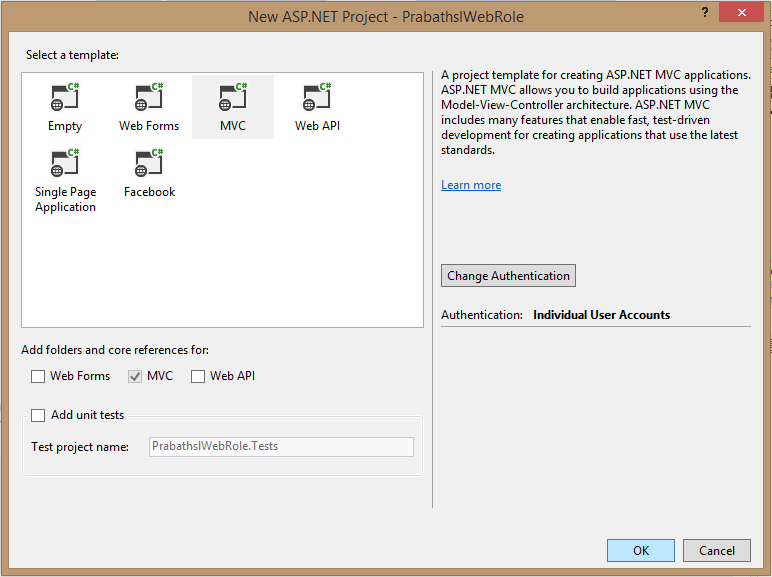
In here click on Change Authentication button.
Then use Organizational Account option
Select Single sign On (here we just use Azure AD)
Enter your Azure AD Domain and select the required authorities from Access level
Then click Ok we are done .......
Debug Tips ..
If you found user credential verification failed azure error with visual studio
Shut down Visual Studio
Go to your Azure management portal, and create a new user account
within the Active Directory you created (I set mine as a Global Admin).
Open up VS again and go through the steps of creating the WebApi
project. This time, when you choose Organizational Accounts for
authentication, use the credentials of the user that you just created -
it should work now.
Lets see how to publish your cloud service to Azure with visual studio. In here I'm going to use same loud service that we build in my previous post Creating Cloud Service.
1. Open your solution in Visual Studio and select your project R-Click and then Publish
2. Then it will prompt Publish Windows Azure Application windows. Then sign in to your Azure Account and select your subscription that you want to use and click Next
3. Then it will gives you Publish Settings form from it if you already have created Cloud service in Azure you can select that service to publish. If not you can create new Service (i'm creating new Service here )
Create new will prompt new window and add name to your service and Select nearest data center for the location.
4. Then you have to select your created service name and Environment to host. In Azure it provide two environment to host your services.
Production Environment
Staging Environment
Production Environment contains the actual running application. Production environment is trusted and currently our customers are accessed this environment if we already punished this service and it is up and running.
When we are updating new version of same Service directly to the production environment meanwhile we doing the update our application will not functional. Our users cant access the application. And another hand we don't know that our new version is exactly functioning well within hosted environment. Sometimes there may be bugs.
To avoid those problems Azure provide us concept called Staging Environment if we publish app to the staging environment it will gives us separate URL for the newly published app mean wile our Production environment is up and running. We can verify that our new version is up and running meanwhile older version will serve our customers. Once we verify that our new version is ready to go its single click away. There is SWAP (VIP Swap) button in azure portal in staging application. It will automatically connect the traffic to Staging application.
What it does is it swap the IP address between selected staging environment and Production. now Our staging is production and production become staging. Its called VIP Swap.
Azure allows you to have maximum 5 staging's per Application
Lets back to subject :)
In my case im going to publish brand new application and therefore i can directly publish to production environment . but after that if you make new version go with best practices
and I'm using Release binaries and use service configuration file as cloud version. And with enable remote desktop i can loginto VM's that my service web role's is hosted ad username and password if you need remote desktop enabled
With Advanced tab you can define the service hosted storage and configurations as you need.
Here is Some publisher logs and you can understand what is happened when publishing (* My web roles have 2 instances ) 6:59:40 PM - Connecting... 6:59:40 PM - Verifying storage account 'portalvhdsjf2mmx92gk60l'... 6:59:41 PM - Uploading Package... 7:02:35 PM - Creating... 7:03:23 PM - Created Deployment ID: XXXXXXXXXXXXXXXX. 7:03:23 PM - Instance 0 of role PrabathslWebRole is stopped 7:03:23 PM - Instance 1 of role PrabathslWebRole is stopped 7:03:24 PM - Starting... 7:03:41 PM - Initializing... 7:03:42 PM - Instance 0 of role PrabathslWebRole is creating the virtual machine 7:03:42 PM - Instance 1 of role PrabathslWebRole is creating the virtual machine 7:04:47 PM - Instance 0 of role PrabathslWebRole is starting the virtual machine 7:04:47 PM - Instance 1 of role PrabathslWebRole is starting the virtual machine 7:06:25 PM - Instance 0 of role PrabathslWebRole is in an unknown state 7:06:25 PM - Instance 1 of role PrabathslWebRole is in an unknown state 7:07:00 PM - Instance 0 of role PrabathslWebRole is busy 7:07:00 PM - Instance 1 of role PrabathslWebRole is busy 7:08:07 PM - Instance 0 of role PrabathslWebRole is ready 7:08:07 PM - Instance 1 of role PrabathslWebRole is ready 7:08:07 PM - Created Website URL: http://prabathblogdemo.cloudapp.net/ 7:08:07 PM - Complete.
Hosted App
Here is created instances in Azure Portal
You can connect those Hosted VM's using Connect button via remote desktop using given credentials when you publish app


 This will provide you great UI with documentations. Click here to see documentations.
  This will provide you great UI with documentations. Click here to see documentations.